Okay friends, today I totally tried my hand at making a cricket-themed celebration cake. Sounded simpler in my head than it turned out, lemme tell ya. Honestly? Felt like I was in a bit of a kitchen scramble for parts of it.
The Whole Idea & Gearing Up
Right, the point was to make something that screamed cricket for a little get-together, but wasn’t super fancy or needed mad chef skills. “Cricket bat cake” was the plan. Simple, obvious, right? Went out yesterday and grabbed my gear:
- A plain rectangle loaf cake (store-bought – life’s too short sometimes).
- A tub of plain white frosting.
- Brown food coloring gel (this stuff is powerful, learned that the hard way).
- Black gel icing in one of those little tubes with a nozzle.
- Green food coloring for the ‘pitch’.
- Some desiccated coconut for grass texture.
- And popsicle sticks. Yeah, you read that right, popsicle sticks. Needed them for bracing!
Operation Cricket Bat Cake Begins
First job? Color that frosting to look like real wood. Squeezed in a tiny blob of brown gel… looked like muddy water. Added another blob. Still too light. Kept adding micro-dots until suddenly, whoops, it went way too dark brown, almost chocolatey. Panic station! Dumped in more white frosting to lighten it up. Ended up with a kinda reddish-brown that looked decently like willow wood. Phew.
Frosted the entire loaf cake with this stuff. Made it smooth-ish. Felt pretty proud at this point.
Getting the Shape Right (Sort Of)
This part was trickier. The whole loaf shape is good, but a cricket bat handle is thinner, right? Tried carefully carving down one end of the cake with a knife to narrow it. Felt like sculpting with mashed potatoes! Bits kept crumbling off. Got it vaguely handle-shaped, but it looked fragile. This is where those popsicle sticks came in – shoved a couple deep into the cake along the handle part and the start of the blade. Like hidden scaffolding. Made me feel better!
The Fun Part: Decorating
Alright, deep breath, black gel tube in hand.
- The Edges: Ran a thick line of black gel all around the edge of the cake where the ‘blade’ meets the sides. This defines the bat shape. My hand wobbled a bit, it’s not perfect, but passable!
- The Seams: Now, the signature cricket ball stitching pattern! Tried to copy a picture I had on my phone. Dipped the tube nozzle down and made little stitches along the edge lines I just did. Just short little dashes next to each other. Looked messy close up, but from a couple feet away? Boom, looked like stitching. Win!
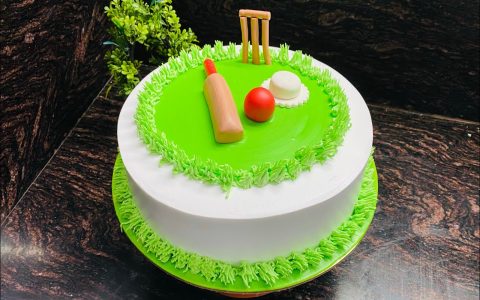
Making the Pitch
The cake looked lonely on the board. Needed grass! Mixed green food coloring with some of the leftover white frosting, aiming for a cricket pitch green. Painted this onto the cake board around the bat. Realized it looked too flat. Sprinkled desiccated coconut onto the wet green frosting. Instant grassy texture! Pressed it down gently. Added way more coconut than I thought I needed – really made it pop.
The Verdict
Stood back and looked at it. Not a pro job, nope. The handle’s a bit lopsided where I carved, the stitching lines wobble, and my wood color mixing was… dramatic. BUT, when I plonked it down at the gathering, everyone immediately knew what it was supposed to be! “Whoa, a cricket bat cake!” they said. Mission accomplished.
So yeah, totally doable for a regular person like me. Just gotta be prepared for the frosting color dance and maybe have popsicle sticks handy for stability! The decorating itself, especially the stitching, was surprisingly straightforward once I stopped overthinking it. Simple tools, simple (if messy!) steps.